File Formats | Delivering Multimedia | Compressing Audio and Video | QuickTime Compressors
Ink Options | Text Options | Special Effect Options | Transition Options
Compressing Audio and Video
Electrifier Pro allows you to compress your audio and video files to take advantage of the latest cutting-edge compression algorithms. Whether you plan to deliver your multimedia to the web or to CD-ROM, there are compelling reasons for keeping file sizes low. Small files appear more quickly, and take up less room, which allows you to use sophisticated graphics without overloading your connection or drive.
Since audio and video compression involves discarding some data, recompressing already-compressed audio or video can significantly reduce the quality of your multimedia. We strongly recommend that you work with your original uncompressed files when compressing audio or video for use with Electrifier Pro.
Working with Audio and video from external sources
Before you can work with audio or video files, you need to transfer them onto your computer. The full process of bringing audio and video into your computer will depend on the specific hardware and software you use for the import, so please consult the manufacturer's manuals for details on each stage of the process.
- Creating the original recording
- Once you have recorded your audio or video, you will need to transfer it onto your computer in order to use it with Electrifier Pro. Higher-quality originals will produce better final movies, so we recommend that you use BetaCam-SP or DV cameras for video, and DAT tapes or audio CDs for audio. The quality of the original is important even for compact audio and video for use on the Web, because higher-quality files can be compressed more effectively.
- Transferring the file to your computer
-
- Transferring Video
-
Transferring with video from external sources such as video cameras or VCRs onto your computer requires additional hardware and software (a video capture card and editing software) that may or may not be installed on your computer.
A video capture card takes the signal from your video camera, converts it to a digital signal (if necessary) and then saves it to your hard disk or other storage device. Some video capture cards also compress the video signal before they save it, since an uncompressed video signal may require anywhere between 1 to 30 megabytes (MB) of disk space per second.
If your computer has a video capture card, please consult your manual for instructions on connecting your video camera or VCR to the computer to capture video. You will need a video editing program to control the capture options, but basic editing software is bundled with most video capture cards.
- Transferring Audio
-
Transferring audio from an audio CD to your hard disk requires no additional hardware or software beyond a CD-ROM drive. To transfer an audio track from a CD,
- Open MoviePlayer Pro
- Choose Import from the File menu. An Open dialog box appears.
- Locate and select the file you'd like to import.The Open button changes to Convert.
- Click Convert. A Save dialog box appears, with a filename already provided
- Select a folder and name with which to save the file. If you click the Options button, a dialog box appears in which you can select the sound quality options, and which portion of the track to import. Select the settings you want to use and click OK
- Click Save to create a new QuickTime audio file with the CD audio content.
Transferring audio from another source, such as an audio DAT drive, may require additional hardware and software. If your computer has audio editing hardware or software, please consult your manual for instructions on connecting the source unit to your computer.
File formats and media compression
Audio and video files can be stored in a wide range of file formats, such as QuickTime, Wave, or MPEG, but since all these file formats can be imported by Electrifier (and saved as QuickTime movies), we will focus exclusively on QuickTime files.
Audio and video within a file can be compressed using any of the media compressors (also called "codecs", from "compressor/decompressors") supported by that format. Media compressors use complex mathematical algorithms to compress the data, generally by identifying unnecessary or redundant data and throwing it away. Though compressors are sometimes referred to as compression formats, the compressor used is independent of the format of the file: a QuickTime movie with Sorensen Video compression has the same file format as a QuickTime movie with Motion-JPEG compression, but uses a different compressor, while a QuickTime movie with Cinepak compression uses the same compressor as a Video for Windows file with Cinepak compression, but uses a different file format.
When you compress a file with Electrifier Pro, the file is saved in the QuickTime file format, using the compressors you selected in the Compress Video/Audio window. For more information about compressing files, see below.
How media compression works
Uncompressed video takes up huge amounts of disk space (anywhere from 1 to 30 MB per second of video. In order to deliver video over the Web (or even on CD-ROM), the video is compressed by removing unnecessary data until the file size is manageable.
- Video compression
- There are two basic methods of identifying and removing unnecessary data in an video clip--compression within each frame and compression between frames.
In-frame compression of a video works identifying regions of flat color and describing them as blocks. This saves memory and disk space by allowing the movie to describe only a small number of regions instead of a much larger number of pixels. In-frame compression works best on images with fewer fine details. Since the computer can't tell video noise from fine detail, a high-quality original will generally improve compression.
Between-frame compression works by only describing the changes between frames. Instead of describing all the pixels in the frame, it describes only those pixels which changed since the last frame. This can cause the quality of the video to decrease over time, so you should generally include a keyframe (a frame which is described completely) every second or two. Some compressors, such as Sorensen Video, can detect how much of the image has changed since the last keyframe, and insert new keyframes whenever necessary. Between-frame compression works best on images with largely still backgrounds, so shooting your video from a tripod will generally improve between-frame compression.
- Audio compression
- Audio compression uses techniques similar to those used in video compression. However, there are not simple visual descriptions of the process such as those for video compression, so we will not describe those techniques in depth.
How to reduce file size
Even when using a sophisticated compressor such as Sorensen Video or QDesign Music, you may need to take extra measures to reduce the file size in order to produce sufficiently high-quality audio or video that will stream over a modem connection.
- Reducing video file size
- The two basic methods of reducing the file size for a video are to reduce the file size for each frame or to reduce the number of frames.
The frame file size can be reduced by simply scaling the video down so there are fewer pixels to describe per frame. Electrifier Pro scales video very smoothly, particularly when using the Sorensen Video codec, so you can reduce the file size significantly by using the Scale to Fit option with dimensions half as large as those you want to use in your multimedia, and then zooming the video to 200% in Electrifier Pro.
The number of frames can be reduced by lowering the frame rate of the movie. This produces video that is less smooth, but retains the full resolution of each frame.
- Reducing audio file size
- The methods of reducing the file size for an audio clip are very similar to those for video: to reduce the size of each sound sample or to reduce the number of samples in the clip.
The sample size can be reduced by lowering the sample depth of the audio. This produces audio that is smooth but not as rich (lowering the sample depth reduces the number of tones in the sound, rather like reducing the number of colors in a still image from thousands of colors to 256 colors).
The number of samples can be reduced by lowering the sample rate of the movie. This produces audio that is less smooth, but retains the fullness of the tone (lowering the sample rate reduces the response rate of the sound, rather like reducing the resolution of a still image).
Recommended codecs
We recommend the Sorensen Video compressor for use with video, and the QDesign Music and PureVoice compressors for use with audio. All these compressors allow you to create the smallest possible files so your multimedia will play as it downloads, even over a 28.8 modem.
Sorensen Video allows you to specify the data rate for your movie, which limits the file size so the video will be able to stream across a given connection. The Pro version of the Sorensen Video codec allows you to control how closely the data rate is tracked. Loose data rate tracking allows the movie to "save up" unused bandwidth from low-activity periods (when between-frame compression is very efficient) for use during peak video activity, thus providing more constant quality (fixed-rate movies decrease in quality during sudden changes because they have to use more in-frame compression). Data rate tracking should be fairly loose (around 60) for web movies, and fairly tight (around 30) for CD-ROM movies.
QDesign's Music compressor is best for use with music files, and other continuous sound samples. QDesign Music allows you to specify the data rate for your movie, which limits the file size so the video will be able to stream across a given connection. The Pro version of the QDesign Music codec has preset configurations optimized for various types of music and sounds, thus providing higher quality for the appropriate styles.
Qualcomm's PureVoice compressor is best for use with web-based voice recordings, and other intermittent sound samples. The PureVoice compressor was designed for use in digital cellular phones, and provides telephone-quality speech quality at extremely low bandwidths.
For more information
For a list of the graphics and audio compressors included with QuickTime, see the Supported Compressors appendix.
Using the Compress Video/Audio window
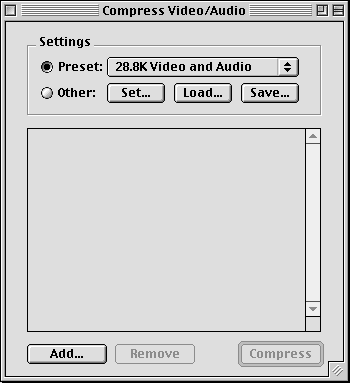
The Compress Video/Audio window allows you to compress audio and video actors for use in Electrifier Pro. You can even batch-compress groups of files when your computer is idle (while you are in a meeting, for example) for improved efficiency.
- The Compress Video/Audio window
-

The Compress Video/Audio window includes preset options for streaming playback over modem speeds, plus you can create and save your own settings to match your needs.
Preset: Electrifier Pro includes several optimized settings for streaming playback over various modem speeds. Options include:
- 28.8K Video and Audio: 160x120; Sorenson Video, 5 fps, keyframe every 50, 1.699 K/s; PureVoice, 8 kHz, 16 bit, mono, half rate; fast start, compress header.
- 28.8K Audio: QDesign, 11.025 kHz, 16 bit, mono, 20 kbit/s; fast start, compress header.
- 28.8K Audio (voice only): PureVoice, 11.025 kHz, 16 bit, mono, full rate; fast start, compress header.
- 56K Video and Audio: 192x144; Sorenson Video, 7.5 fps, keyframe every 75, 4.199 K/s; PureVoice, 8 kHz, 16 bit, mono, full rate; fast start, compress header.
- 56K Audio: QDesign, 22.050 kHz, 16 bit, mono, 32 kbit/s; fast start, compress header.
- ISDN Video and Audio: 240x180; Sorenson Video, 12 fps, keyframe every 120, 9 K/s; QDesign, 8 kHz, 16 bit mono, 24 kbit/s; fast start, compress header.
- ISDN Audio: QDesign, 22.050 kHz, 16 bit, mono, 48 kbit/s; fast start, compress header.
Set: Creates new settings using any of QuickTime's media compressors. See the Compression options appendix for a list of all the standard audio and video compressors. If you have installed third-party compressors such as Intel Indeo or the Duck TrueMotion compressor, you will have additional compression options.
See the Compress Video/Audio Settings dialog, below, for more information about the setting options.
Load: Loads a saved compression settings file.
Save: Saves the current compression settings to a file, so you can create customized settings for different uses.
Add: Adds files to the compression list. A standard file-opening dialog will appear allowing you to choose the audio or video file you want to convert. You can also add files to the conversion list by dragging them to the Compress Video/Audio window.
Remove: Removes files from the list so they will not be compressed with the current batch.
Compress: Compresses all the files in the list using the current settings.
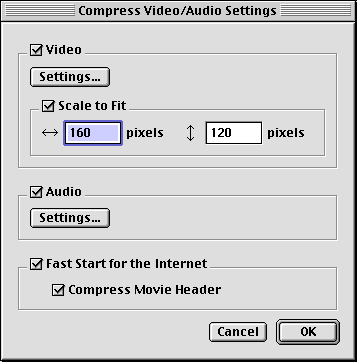
- The Compress Video/Audio Settings dialog
-

Video Settings: Opens the Video Settings dialog.
Scale to Fit: Scales the video to fit a specific size.
Audio Settings: Opens the Sound Settings dialog.
Fast Start for the Internet: Optimizes the movie for streaming over the Internet.
Compress Movie Header: Compresses the movie header information so the movie will begin streaming sooner.
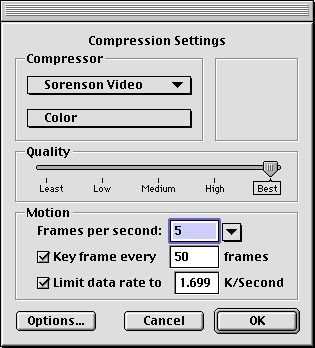
- The Video Settings dialog
-

Compressor: Chooses the video compressor to use.
Color: Chooses the number of colors to use. Color options vary from compressor to compressor, and can range from black and white to billions of colors (millions of colors with 256 levels of transparency).
Quality: Sets the frame image quality for the video. Higher Quality settings produce less in-frame compression and larger files.
Frames per second: Sets the frame rate of the video. Higher frame rates produce smoother video but larger files.
Key Frames: Sets the key frame timing. More frequent key frames improve the quality of the video but reduce between-frame compression. Generally, a key frame should be used every second or two; however, some compressors such as Sorenson Video insert key frames as needed, and for these compressors a longer key frame rate such as ten seconds may be preferable.
Data Rate: Limits the amount of data to be played back each second. If the data rate of a movie is slower than that of the connection (generally either a modem or a slow CD-ROM drive), it will be able to play back smoothly, instead of having to pause periodically to wait for the next chunk of data to load. Data rate limiting is only available for compressors designed for Web- or CD-ROM-based video, such as Sorensen Video, H.236, or Cinepak.
Options: Sets the options for the selected compressor.
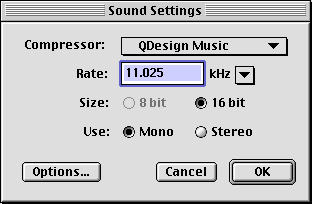
- The Sound Settings dialog
-

Compressor: Chooses the audio compressor to use.
Rate: Sets the audio sample rate. Higher sample rates reduce between-sample compression and increase file size. 44 kHz is CD-quality.
Size: Sets the audio sample size. Higher sample sizes reduce in-sample compression and increase file size. 16 bit is CD-quality.
Use: Sets the number of channels to use in the audio.
Options: Sets the options for the selected compressor.
File Formats | Delivering Multimedia | Compressing Audio and Video | QuickTime Compressors
Ink Options | Text Options | Special Effect Options | Transition Options
Copyright © 1998 Electrifier, Inc. All rights reserved.


